> ## Documentation Index
> Fetch the complete documentation index at: https://docs.requesty.ai/llms.txt
> Use this file to discover all available pages before exploring further.
# GitHub Copilot
> Requesty routing for GitHub Copilot Chat in VS Code
[GitHub Copilot](https://github.com/features/copilot) for Visual Studio Code supports **Bring Your Own Key (BYOK)** through a Custom Endpoint provider. By pointing that endpoint at Requesty, you can drive Copilot Chat, tools, and MCP servers with any model in the Requesty Model Library.
Using the Requesty integration, you can:
* Access **300+ models** from OpenAI, Anthropic, Google, Mistral, and many other providers through one API key.
* Track and manage your spend in a single location.
* Apply [fallback policies](/features/fallback-policies), [load balancing](/features/load-balancing-policies), and [latency routing](/features/latency-routing) to keep Copilot responsive.
## Requirements
This integration requires **Visual Studio Code 1.122** or later. The Custom Endpoint provider reached Stable, and BYOK now works without a GitHub sign-in, in the 1.122 release (May 28, 2026). Use **Check for Updates** in VS Code to upgrade.
Copilot's inline suggestions and next edit suggestions (NES) still require a GitHub sign-in. BYOK powers **chat, tools, and MCP servers** only.
## Prerequisites
* VS Code **1.122** or later with the GitHub Copilot Chat extension installed.
* A Requesty API key from the [API Keys page](https://app.requesty.ai/api-keys).
## Configuration
### 1. Open Manage Language Models
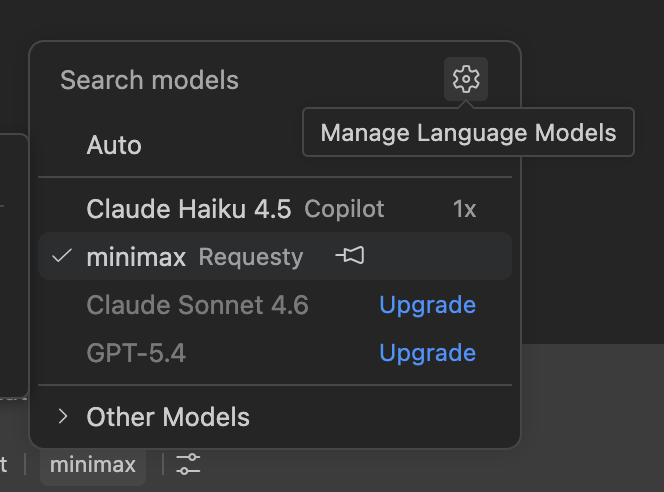
In the Chat view, open the model picker and select the gear icon, then **Manage Language Models**. You can also run **Chat: Manage Language Models** from the Command Palette.
 ### 2. Add Requesty as a Custom Endpoint
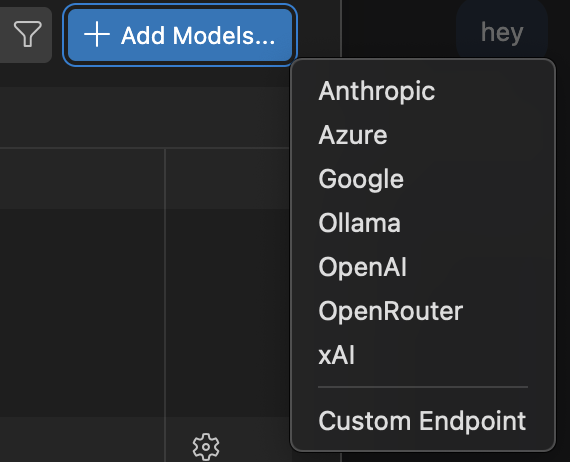
Select **Add Models...** and choose **Custom Endpoint** from the provider list.
### 2. Add Requesty as a Custom Endpoint
Select **Add Models...** and choose **Custom Endpoint** from the provider list.
 When prompted, enter the Requesty endpoint and credentials:
| Field | Value |
| ------- | -------------------------------------- |
| URL | `https://router.requesty.ai` |
| API Key | Your Requesty API key (`rqsty-sk-...`) |
### 3. Choose the API type
VS Code asks which API the endpoint speaks: Chat Completions, Responses, or Messages. We recommend choosing **messages**.
Use the **messages** API type to get the most out of Anthropic models. The Messages API gives you access to native Anthropic features that are not available through Chat Completions or Responses.
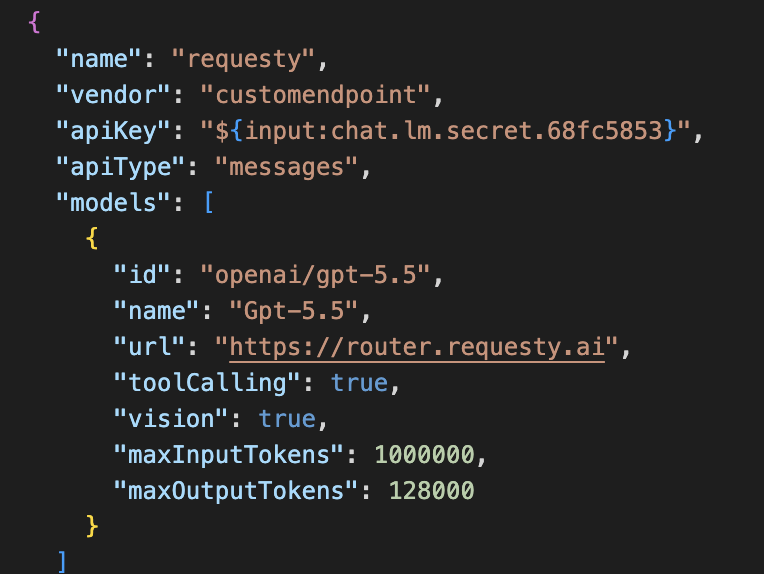
VS Code stores the provider in your `settings.json`. The result looks like this:
When prompted, enter the Requesty endpoint and credentials:
| Field | Value |
| ------- | -------------------------------------- |
| URL | `https://router.requesty.ai` |
| API Key | Your Requesty API key (`rqsty-sk-...`) |
### 3. Choose the API type
VS Code asks which API the endpoint speaks: Chat Completions, Responses, or Messages. We recommend choosing **messages**.
Use the **messages** API type to get the most out of Anthropic models. The Messages API gives you access to native Anthropic features that are not available through Chat Completions or Responses.
VS Code stores the provider in your `settings.json`. The result looks like this:
 ```json theme={"dark"}
{
"name": "requesty",
"vendor": "customendpoint",
"apiKey": "${input:chat.lm.secret.xxxxxxxx}",
"apiType": "messages",
"models": [
{
"id": "openai/gpt-5.5",
"name": "Gpt-5.5",
"url": "https://router.requesty.ai",
"toolCalling": true,
"vision": true,
"maxInputTokens": 1000000,
"maxOutputTokens": 128000
}
]
}
```
Set each model's `id` to a model from the [Model Library](https://app.requesty.ai/model-list) (for example `anthropic/claude-sonnet-4-6`) and point `url` at `https://router.requesty.ai`. You can add multiple entries to the `models` array.
### 4. Select a model
After adding the provider, your Requesty models appear in the model picker tagged with **Requesty**. Pick one to start chatting.
You can choose any model from the [Model Library](https://app.requesty.ai/model-list).
**Standard model IDs** follow the format `provider/model-name`:
* `anthropic/claude-sonnet-4-6`
* `openai/gpt-5.4`
**Policies** follow the format `policy/policy-name`:
* `policy/reliable-coding`
See [Routing Policies](/features/fallback-policies) for how to create a policy that automatically falls back between models.
## Utility models
A few flows in VS Code, such as chat title generation, commit message generation, and feedback, use a smaller utility model that normally comes from your Copilot subscription. When you use BYOK while signed out, point those at a Requesty model too:
1. When the notification appears in the chat input, select **Configure**.
2. Set both `chat.utilityModel` and `chat.utilitySmallModel` to one of your Requesty models.
This unlocks the full set of AI features using your own key. If you only need chat, you can dismiss the notification and leave the utility-driven features inactive.
## Verification
Send a simple prompt in Copilot Chat. The expected output is a working response from the model. Then check the [Requesty analytics dashboard](https://app.requesty.ai/analytics) to confirm the request was logged.
## Troubleshooting
The Chat view becomes available once at least one BYOK model is configured. Add the Requesty Custom Endpoint and reload the window if needed.
On VS Code 1.122+, sign-in prompts are suppressed once a BYOK model is configured. Confirm your VS Code version with **Help → About** and update if it is below 1.122.
Send a unique, traceable prompt and re-check the [analytics dashboard](https://app.requesty.ai/analytics). Confirm the URL is `https://router.requesty.ai` and the API key is valid.
If your Requesty models are missing from the model picker, reopen the Manage Language Models view from the Command Palette:
1. Open the Command Palette: `Cmd+Shift+P` (Mac) or `Ctrl+Shift+P` (Windows/Linux).
2. Type: **Chat: Manage Language Models** and select it.
Re-add or re-select the Requesty Custom Endpoint, then reload the window if the models still don't show.
## Security
Do not commit your API key into shared docs or version-controlled files. VS Code stores BYOK credentials locally.
## References
* [GitHub Copilot](https://github.com/features/copilot)
* [VS Code 1.122 Release Notes](https://code.visualstudio.com/updates)
* [Requesty API Keys](https://app.requesty.ai/api-keys)
* [Requesty Model Library](https://app.requesty.ai/model-list)
* [Requesty Routing Policies](/features/fallback-policies)
```json theme={"dark"}
{
"name": "requesty",
"vendor": "customendpoint",
"apiKey": "${input:chat.lm.secret.xxxxxxxx}",
"apiType": "messages",
"models": [
{
"id": "openai/gpt-5.5",
"name": "Gpt-5.5",
"url": "https://router.requesty.ai",
"toolCalling": true,
"vision": true,
"maxInputTokens": 1000000,
"maxOutputTokens": 128000
}
]
}
```
Set each model's `id` to a model from the [Model Library](https://app.requesty.ai/model-list) (for example `anthropic/claude-sonnet-4-6`) and point `url` at `https://router.requesty.ai`. You can add multiple entries to the `models` array.
### 4. Select a model
After adding the provider, your Requesty models appear in the model picker tagged with **Requesty**. Pick one to start chatting.
You can choose any model from the [Model Library](https://app.requesty.ai/model-list).
**Standard model IDs** follow the format `provider/model-name`:
* `anthropic/claude-sonnet-4-6`
* `openai/gpt-5.4`
**Policies** follow the format `policy/policy-name`:
* `policy/reliable-coding`
See [Routing Policies](/features/fallback-policies) for how to create a policy that automatically falls back between models.
## Utility models
A few flows in VS Code, such as chat title generation, commit message generation, and feedback, use a smaller utility model that normally comes from your Copilot subscription. When you use BYOK while signed out, point those at a Requesty model too:
1. When the notification appears in the chat input, select **Configure**.
2. Set both `chat.utilityModel` and `chat.utilitySmallModel` to one of your Requesty models.
This unlocks the full set of AI features using your own key. If you only need chat, you can dismiss the notification and leave the utility-driven features inactive.
## Verification
Send a simple prompt in Copilot Chat. The expected output is a working response from the model. Then check the [Requesty analytics dashboard](https://app.requesty.ai/analytics) to confirm the request was logged.
## Troubleshooting
The Chat view becomes available once at least one BYOK model is configured. Add the Requesty Custom Endpoint and reload the window if needed.
On VS Code 1.122+, sign-in prompts are suppressed once a BYOK model is configured. Confirm your VS Code version with **Help → About** and update if it is below 1.122.
Send a unique, traceable prompt and re-check the [analytics dashboard](https://app.requesty.ai/analytics). Confirm the URL is `https://router.requesty.ai` and the API key is valid.
If your Requesty models are missing from the model picker, reopen the Manage Language Models view from the Command Palette:
1. Open the Command Palette: `Cmd+Shift+P` (Mac) or `Ctrl+Shift+P` (Windows/Linux).
2. Type: **Chat: Manage Language Models** and select it.
Re-add or re-select the Requesty Custom Endpoint, then reload the window if the models still don't show.
## Security
Do not commit your API key into shared docs or version-controlled files. VS Code stores BYOK credentials locally.
## References
* [GitHub Copilot](https://github.com/features/copilot)
* [VS Code 1.122 Release Notes](https://code.visualstudio.com/updates)
* [Requesty API Keys](https://app.requesty.ai/api-keys)
* [Requesty Model Library](https://app.requesty.ai/model-list)
* [Requesty Routing Policies](/features/fallback-policies)